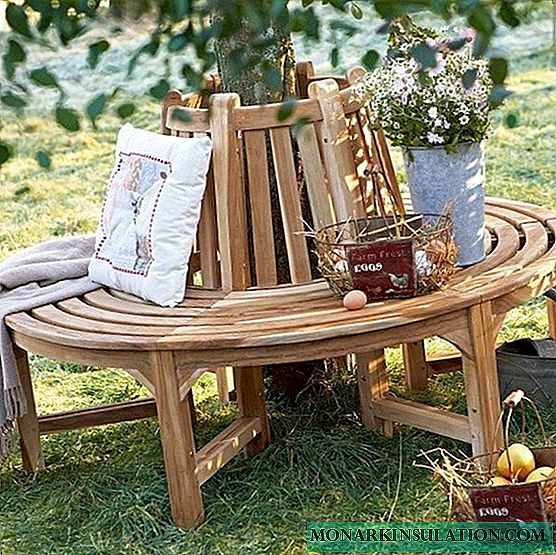
Improvement of the landscape is not one day. In addition to the construction of the main buildings and the arrangement of the garden, you always want to highlight a place for relaxation, where you can enjoy unity with nature. And the main element of such a cozy corner in the open air will certainly be garden furniture. If there is not so much free space on the site, you can use the near-trunk areas of trees by setting a round bench with a table under them. How to build a round bench and a table for a garden around for a tree, we will consider in more detail.
Where is it better to build such furniture?
The benches around the tree for many years top the popularity rating among landscape designers and connoisseurs of comfort and beauty. From metal or wood, with or without a back, simple designs or elegant products decorated with ornaments - they never go out of style.
The reason for this popularity, most likely, is that they are framing the trunks. Large spreading trees attractively affect a person, because under his powerful branches anyone feels protected.

The bench under the tree is a kind of symbol of the unity of man with his surrounding nature: while maintaining its functional and decorative qualities, it becomes part of the inhabited garden
The key element of this pair, of course, is the tree. Therefore, the bench framing it should not hamper, much less damage the trunk. A round bench is best set under a chestnut, birch, willow or nut.
Fruit trees are far from the best option. The falling fruits of the trees will spoil the appearance of the furniture, leaving marks on the light surface of the wood.

It’s great if a picturesque panorama opens onto the beautiful flower garden, pond or arch with climbing plants from the bench.
On hot summer days, it’s nice to rest on such a bench, hiding under the shade of foliage. In the autumn months, when the leaves are already falling, you will enjoy the warmth of the last rays of the sun.
The choice of materials for construction
Garden furniture is designed not only to provide comfortable conditions for relaxation in the center of green spaces in the fresh air, but also to serve as a bright accent of the original design of a shady corner.
Material for its manufacture may be: wood, stone, metal. But nevertheless the most harmonious in the garden area looks exactly wooden furniture.

Having a unique texture, wooden benches look equally good both among the greenery of the garden, and against the background of stone and brick buildings of the site
When choosing material to create a wooden bench or table, give preference to species of wood with a dense structure. They are able to better withstand the negative effects of precipitation, while maintaining a presentable appearance for several seasons.

Larch is great for making garden furniture: the amount of oils and adhesives makes it the least vulnerable to high humidity and temperature fluctuations.
Among inexpensive species for the manufacture of outdoor tables and chairs, pine, acacia, cherry or spruce are also well suited. Oak and walnut have a beautiful color and texture. But even with high-quality processing, they are less resistant to climate change, and under the influence of direct sunlight they can even completely dry out.
Regardless of the choice of wood species, for garden furniture to serve more than one season, all wooden parts and elements must be treated with protective impregnations from both the front and the back.
Master class # 1 - mastering a round bench
The easiest way to make a circular bench is to create a hexagonal structure with a back adjacent to a tree trunk. The legs of the bench should not damage the aerial parts of the roots of the plant. When determining the distance between a bench seat and a tree trunk, it is necessary to make a margin of 10-15 cm for its growth in thickness.
To make a round bench that will frame the tree with a trunk diameter of 60 cm, you will need:
- 6 blanks 40/60/80/100 mm long, 80-100 mm wide;
- 12 workpieces 50-60 cm long for legs;
- 6 blanks 60-80 cm long for crossbars;
- 6 slats for the manufacture of backs;
- 6 strips to create an apron;
- screws or screws.
Use only well-dried wood for work. This will reduce the likelihood of cracking on the surface during operation of the bench.
From the tools you need to prepare:
- screwdriver or screwdriver;
- power saw or hacksaw;
- bulgaria with a nozzle for grinding;
- garden shovel;
- hammer.
A circular bench is a structure consisting of six identical sections. The size of the sections depends on the diameter of the tree. It is measured at the height of the seat, adding 15-20 cm to the stock to the result to ensure further growth of the tree. To determine the length of the short sides of the inner plates of the bench, the obtained measurement result is divided by 1.75.

In order for the circular bench to be assembled to have the correct shape and perfectly even edges, the cutting angle of each section should be equal to 30 °
To create symmetrical even edges and obtain even bevels between adjacent seat trims, when cutting parts, you should connect them to each other by meter boards.
Blanks for seating are laid out in four rows on a flat plane. So that the assembled seat boards do not adjoin close to each other, at the stage of assembly of the structure, gaskets 1 cm thick are installed between them.

On the extreme board, which will be the short side of the inner plate of the bench, mark the cut points at an angle of 30 °
Having marked the place of the cut along the extreme board, they transfer the line to the boards of adjacent rows, maintaining the same angle of inclination. In each next row, the plates will be longer than in the previous one. Using the same technology, 5 more patterns of the same size are cut.

The correct dimensions of the seat can be easily checked by laying out all the patterns and docking their edges so that an isosceles hexagon is obtained
After making sure that the calculations are correct and that the seat elements are correctly assembled, they begin to manufacture the bench legs. The design of the circular bench provides for the installation of internal and external legs. Their length depends on the desired seat height. On average, it is 60-70 cm.

To stiffen the structure, connect the legs with cross members whose length will be equal to the width of the bench seat
12 identical legs are cut to the height of the seat. If the ground around the tree has an uneven surface, make the blanks for the legs a little longer than the intended size. Later in the installation process, you can always level the height by sprinkling or, conversely, removing the soil layer under the bench legs.
To connect the legs with the cross members parallel to each other, on the support posts and cross members make a marker marker, which will act as a guide when drilling through holes. To create a rigid structure, the holes are drilled staggered, placing them diagonally and capturing the legs with cross members.
Bolts are inserted into the through holes and, having strung a washer with a nut on them, are tightly tightened with an adjustable wrench. The same actions are performed when tightening the remaining five nodes.

The easiest way to connect the legs to the bench seat is to set them upright and secure them with clamps, and then place the seat boards on them.
The seat strips are laid out on the support racks so that the joints between the boards are located strictly in the center above the legs. The strips themselves need to be slightly shifted towards the front legs so that they extend beyond the edges.
After making sure that the assembly is correct, connect two adjacent sections. First, the external support legs are screwed, and then the internal legs are “screwed” onto the screws. The result should be two assembled sections, each of which includes three interconnected stripes.

The assembled halves of the circular bench are set on opposite sides of the tree, joining the edges of the adjacent strips
Having "acquired" the joints, re-adjust the location of the external three supports, and only then tighten the screws. Aligning the horizontal surface of the bench with the help of a level, proceed with the installation of the back.

The backrests of all six seats are set at the trailing edge, placing them flush and fixing by bolting
For ease of use, the end bevels are cut at an angle of 30 °. To fix the elements of the bench, the guide screws are screwed through the holes on the inside of the seat and grabbing the backrest. By the same technology they connect all adjacent backs.
At the final stages, an apron is mounted from separate strips. To determine the length of the strips, measure the distance between the outer legs of the bench. After cutting six blanks for the apron, the short edges of each beveled at an angle of 30 °.

To install the apron, alternately apply the boards to the outer sides of the seat, and, fixing it with a clip, screw them to the legs of the bench
The finished bench can only be sanded, eliminating all the roughness, and cover with water-repellent oil impregnation. Wax-based formulations also provide a good result, creating a thin film on the surface that prevents moisture from entering the environment.

The manufacturing process of a tetrahedral bench is not much different from the production technology of a hexagonal bench
Having set a circular bench in a cool corner of the garden, you can enjoy at any time, leaning on the rough bark of the trunk and listening to the sounds of nature.
Master class # 2 - we build a garden table around a tree
A logical addition to the circular bench of the garden will be a table around a tree, which can also be installed under a neighboring plant.

For arranging the table, it is better to choose a tree with a spreading crown, so that the shadow from it would cover not only the countertop, but also the people sitting at the table
The look and shape of the table can be anything from traditional square designs to table tops of irregular shapes. We propose to build a structure, the tabletop of which is made in the form of the head of an opened flower.
The project is designed to design a tree trunk whose diameter does not exceed 50 cm. If the tree you have chosen to set the table still grows, be sure to make an additional supply for the central hole of the tabletop.
To make a table around a tree you will need:
- a cut of plywood 10-15 mm thick with a size of 1.5x1.5 m;
- a board 25 mm thick and 20x1000 mm in size;
- 2 cuts of a metal strip 45 mm wide and 55 mm thick;
- wooden block 40x40 mm;
- wood and metal screws;
- 2 bolts-ties 50x10 mm;
- 2 nuts and 4 washers.
- paint for metal and wood impregnation.
When determining the dimensions of a metal strip, focus on the thickness of the tree, but at the same time make an additional margin of 90 mm for fastening parts.

Boards for countertops are processed in the form of a petal, rounding the outer edges and making the inner parts for the middle of the flower narrower
A circle with a diameter of 10-12 cm less than the size of the countertop is cut out from a plywood sheet. In the center of the circle, a hole is cut that corresponds to the thickness of the barrel. For installation, the circle is cut in half, the blanks are varnished.
The frame of the structure is constructed from bars 40 cm and 60 cm long. For workpieces 60 cm in size, the ends are cut off at an angle of 45 ° so that one side retains its previous length. Wooden blanks are cleaned with sandpaper and coated with impregnation.
The ends of two cuts of a metal strip with a cross section of 45 mm are bent at a right angle and coated in 2-3 layers with paint. To assemble the structure, the bars are screwed onto the metal blanks so that their ends do not protrude beyond the edge of the strips. The result should be a design that looks like a barrel, but in a mirror version.
The assembled frame is put on a tree trunk, laying under the metal elements of the gasket - pieces of linoleum. Bolts and nuts tighten tightly. Semicircles of plywood are screwed to the vertical elements of the frame using self-tapping screws. Petals are laid out on a plywood circle, forming a countertop in the form of a flower.

Each petal of the "flower" is fixed with a self-tapping screw, maximally deepening the hats so that they do not protrude above the surface
The surface of the petals is treated with sandpaper. If desired, the gaps between the boards are coated with epoxy. The side faces and the surface of the countertops are treated with a protective composition that will minimize the effects of moisture and insects. To give the countertop the desired shade, use a pigment impregnation or regular stain.
Whatever version of a circular bench or table you choose, the main thing is that it harmonizes with the surrounding landscape. In any case, do-it-yourself garden furniture will delight you every time with its originality and uniqueness.