Many gardeners want to grow grapes on their site, but are afraid to face the difficulties that arise. In this case, for breeding, Laura grapes are quite suitable - a table variety that has a lot of advantages and does not require complicated care.
History and description of the variety
Grapes of Laura (the more correct name is Flora) was bred by Odessa breeders. Now grown by gardeners in many regions of Russia.

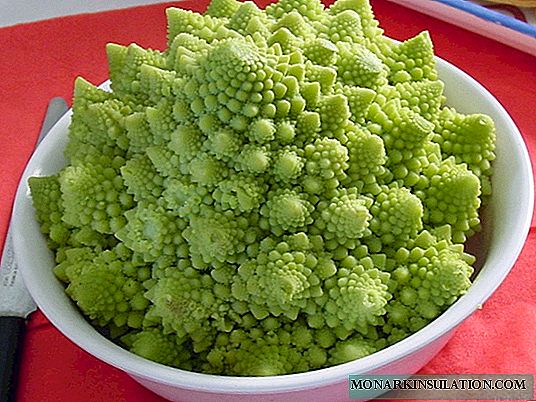
Laura grapes form large brushes with large berries
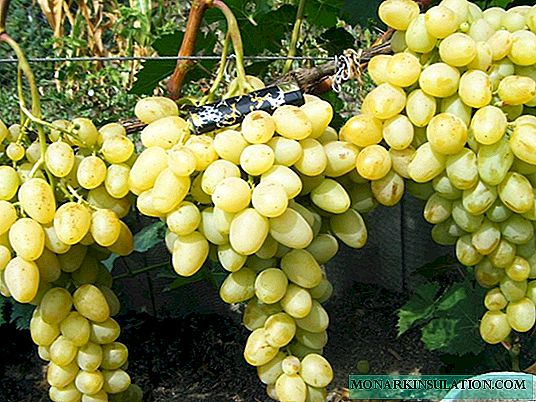
The bush is medium sized, covered with dark green five-lobed leaves. The number of fruitful shoots can reach up to 80% of the total. The flowers are predominantly female type, however, the grapes are pollinated well. The clusters are loose, conical in shape, reach a length of 40 cm. The variety is characterized by the formation of clusters of the same size and mass, so their weight is approximately 1 kg, but individual specimens can weigh 2.5 kg. The berries are oval in shape, light salad in color with a wax coating, weighing 6-10 g. The pulp is juicy, dense, acquires a musky flavor as it ripens.
Begins to bear fruit in the 3rd year after planting.
Advantages:
- precocity. From pollination and ovary formation to fruit ripening, about 120 days pass;
- high productivity. From one bush you can get up to 40 kg of berries. However, it is noted that too many fruits negatively affect their taste, so it is advisable to regulate the load of the bush;
- good fruit retention. The berries are firmly attached to the stem, so they can stay on the bush for a long time and not fall off, and due to their density they tolerate transportation and storage;
- unpretentiousness. This grape can be grown in almost any region except the coldest. It can also tolerate frosts within -21-23aboutFROM;
- resistance to certain diseases. Grapes Laura is not prone to defeat gray and white rot, as well as mildew.
Disadvantages:
- instability of indicators of sugar content and acidity. According to the standards, the sugar content of this grape is 20%, the acidity is 5-8 g / l, but these indicators depend on climatic conditions, the quality of the soil used by agricultural machinery and can change, including downward;
- instability to oidium. The variety does not have immunity to this disease, therefore, preventive measures are necessary to prevent infection.
Video: Laura grape description
Propagation and planting of grapes
In order to ensure the proper development of planting material, it is necessary to carefully follow the recommendations for its preparation and storage.
Chubuk preparation
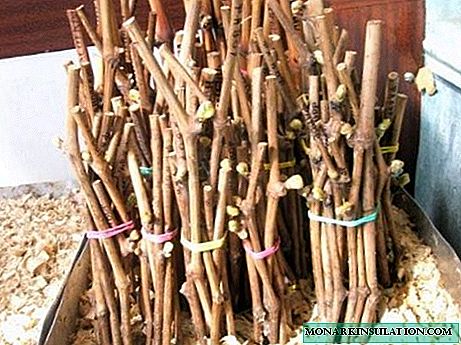
Chubuki (the so-called grape cuttings) must be harvested in the fall. In this case, several rules should be observed:
- the most suitable time for harvesting Chubuk is the period after the end of leaf fall and before severe frosts, the air temperature should not be lower than -10aboutFROM;
- the mother vine should be healthy, free from damage, and give a slight crackle when bent. Color - evenly brown, without spots. Pay attention to the core - it should not be loose. In addition, Chubuki is recommended to be cut from the most developed fruit branches that have matured in the current year;
- cuttings are best taken from the middle of the vine. They should have at least four developed kidneys. The straighter and longer the chubuki, the better the crop will be. The optimal length is 50-70 cm, diameter - not less than 5 mm.
Storage
Storage is carried out as follows:
- Before storing Chubuki for storage, remove all leaves and antennae from them, and then soak in warm soft (boiled, thawed or settled for at least 2 days) water for about a day. At the same time, Chubuki should be completely immersed in water.

Chubuki sent for storage, removing all leaves
- After soaking the cuttings, sanitize them. To do this, a bright pink solution of potassium permanganate (soak chubuki for half an hour) or a solution of copper sulfate (1 teaspoon of salt, dilute in a glass of hot water and wipe / spray material) is suitable. Then remove and dry well.
- After the cuttings have dried, wrap them in a damp cloth, and then put them in a plastic bag and put on the middle shelf of the refrigerator (you need a temperature of 0aboutC to 4aboutFROM). In colder conditions, they will freeze, and in warmer conditions, they can germinate earlier than the right time. Remember to moisten the fabric as needed.

Chubuki are well kept in the refrigerator
- Check the chubuki once a month. If the fabric in which they are wrapped is very wet, then it is necessary to dry them in cool air (for example, on the balcony, the temperature should not be higher than 5aboutC) within 2-3 hours. If mold has formed on the chips, wash them in a maroon solution of potassium permanganate or wipe with a cloth moistened in a solution of copper sulfate (1 teaspoon of salt in a glass of boiling water), dry in cool, and then wrap again in a newspaper, put in a bag and put in the refrigerator.
- If you find that the fabric is dry and there is not the slightest sign of moisture on the bag, then this indicates that the Chubuki are dry. To restore them to their previous state, soak them in soft water by placing the container in a cool place (for example, on a balcony). Soaking time depends on the degree of drying of the material, but keeping chubuki in water for longer than a day is not recommended. After soaking, dry the cuttings according to the method described above and put them back in the refrigerator, packing them in a cloth and bag.

Dried Chubuki can be brought back to life by soaking them for a while in the water
- If you have the opportunity, then you can store chubuki in the cellar. To do this, take a box of sand or sawdust, moisten and stick the cuttings. Check their condition once a month, moistening the substrate if necessary. If mold is noticed, then treat with a solution of potassium permanganate or copper sulphate, soak when dry.
Chubuki can be stored in sand or sawdust


Awakening
In the spring, before further events, it is necessary to check the Chubuki for viability. To do this, make a cut at the ends. If water droplets appeared, then this indicates the viability of the cuttings, their absence - about drying. If you have not yet had time to make a cut, and water started to ooze from the chubuk, then this is a sign that it has rotted.
Pay attention to the color of the cut: if the chubuk is healthy, then it is light green. Cuttings with dark spots are better not to use.
Actions for awakening Chubuk:
- On each viable chubuk, with a pre-sanitized needle or awl, draw noticeable but shallow grooves from the middle to the lower end.
- Chubuki completely immerse in warm soft water (it must be changed at least 4 times) and leave to soak for 2 days.
- After soaking, you can pre-hold the chubuki in a solution that stimulates root formation - Kornevin, Heteroauxin (the chubuki are placed there with a scratched end).
- Then place the cuttings in a container with wet sawdust (layer - 5 cm), put a bag on it and put it in a warm place. Moisten the substrate as needed. Roots should appear in 10-15 days.

By placing the chubuki in the sawdust, you can achieve the rapid appearance of roots
Germination
You can carry out further germination of Chubuk in glasses or in a bottle.
Table: methods for sprouting Chubuk
| Sprouting in a bottle | Sprouting in glasses | |
| Materials | Plastic bottles, drainage, soil, plastic cups. | Plastic cups, plastic cups, soil, plastic bottles without bottom. |
| Technology |
Watering through the pan every 2 days, pouring a small amount of water into it and putting the workpiece there. |
Watering is carried out in the same way. |
Landing
For landing, choose a well-lit and sheltered from the wind place. Groundwater should lie at a depth of not less than 1 m. Any soil is suitable, but it should not have too much clay or salt. A landing site is recommended to be prepared from last year. Chubuki should be planted from mid-May, when the temperature will be at least 17aboutFROM.
Landing Algorithm:
- Dig a hole with a depth of 80 cm. If you want to plant several chubuk, then place holes and rows at a distance of 1.5 m from each other.
- Pour a drainage layer (broken brick, fine gravel) 10 cm thick.

At the bottom of the pit for planting grapes you need to lay a drainage layer
- Pour fertile soil (topsoil removed by digging a pit + 1 kg of humus + 150-200 g of superphosphate + 1 l of ash) and pour.
- Insert a plastic irrigation pipe on the side.
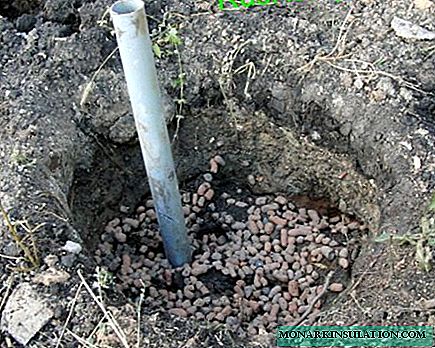
To water the grapes, a pipe is installed in the hole, into which I will then pour water
- Pour a layer of fertile soil again so that 50 cm is left to the edge of the pit, and water.

When planting grapes, cuttings are abundantly watered
- After soaking up the water, drop the chubuck out, gently spreading the roots.
- Fill the hole to the edge.


Further care:
- watering. It is carried out as follows: Dig a circular hole with a depth of 25 cm at a distance of 30 cm from the chubuk. Spill with warm water (10-20 L). Fill the hole with loose soil. First you need to water the grapes once a week, after a month reduce the amount to 1 time in 2 weeks. In August, watering is not necessary so that the vine ripens better;
- shading. After planting, cover the chubuk with newspaper or burlap. It will be possible to remove the material when the plant is strong;
- loosening. Loosen the soil in a timely manner to avoid the appearance of a crust and provide oxygen access to the roots.
Agricultural technology
In order to ensure the most favorable conditions for the growth and development of Laura grapes, all the care rules must be carefully followed.
Normalization
In the spring, grapes must be normalized so as not to overload the bush and get a quality crop. If you have a young plant, then wait until the clusters form, select the best ones, and remove the rest. If your shrub is old enough and you imagine the results of pollination, you know on which vine good clusters are formed, then normalize the grapes early, at the stage of full or partial flowering, so that the plant does not waste energy on developing unnecessary ovaries. Note that Laura forms 35-45 clusters on one bush, but you need to leave no more than 23-25.
Since Laura belongs to large-fruited table grape varieties (the weight of one bunch reaches 1 kg), it is recommended to leave one bunch on one vine. If your grapes form clusters weighing 1.5 kg or more, then completely remove all clusters from every third shoot.
Garter
To ensure the correct development of the grapes, it must be tied to a support. The simplest supporting structure is a trellis. To make it, it is enough to install 2 columns 2.5 m high and 10-12 cm in diameter at a distance of 3-4 m from each other. Pillars can be either concrete or solid wood.
If you use wooden supports, then soak them for a week in a 5% solution of copper sulfate, and then dip the ends in hot resin.
Bury the posts in the ground to a depth of 70 cm. Pull between them a galvanized wire with a diameter of 2.5 mm in 3 rows:
- first row - at a height of 40 cm from the ground,
- the second - 40 cm higher than the first,
- the third is 50 cm higher than the second.

For the proper cultivation of grapes you need to provide it with trellis
Last year's vines are placed on the first (lower) row of trellis. You can tie them at an angle of 45about or horizontally, but not vertically - in this case shoots will grow only from the upper buds, but the eyes located below can not wake up or lag behind in growth. Tie the vines tight so that they do not sway from the wind and are not damaged. Young shoots also need to be tied separately to provide the best blowing ability to the bush.
Video: grape garter
Watering
Grapes Laura refers to early ripe varieties, so it requires two waterings. They need to be carried out when the buds open and at the end of flowering. During the flowering period, you can not water the grapes, because this can provoke shedding of flowers. Watering is best done in the evening. Water consumption - 50 l / m2 if Laura grows on sandy or sandy loamy soils, then increase the rate to 75 l / m2.

You need to water the grapes in the evening with plenty of water
You can water in circular holes (distance to the bush - 70 cm) or in the furrows, if the grapes are planted in rows. Do not forget to fill the holes and furrows of the pitted earth so that the air enters the roots.
If you are watering from a bucket, then wait until the water is completely absorbed into the ground, and then pour the following.
Top dressing
It is necessary to start feeding grapes in early spring, when the snow has not completely melted.
- Scatter superphosphate (40 g / m) over the entire radius of the trunk hole (into which you water the bush)2).
- In May, when the kidneys begin to swell, on the inner edges of the hole, dig 2 holes 40 cm deep on each side and add 0.5 l of the following mixture to each: chicken droppings (1 part) + water (2 parts), all mixed and infused within a week in a warm place, and then diluted in a proportion of 1 part of the solution to 10 parts of water. The second top dressing can be carried out during the second watering: superphosphate (20 g) + ammonium nitrate (10 g) + potassium salt + 10 l of water.
- Foliar top dressing is also beneficial for grapes. It is carried out 2-3 weeks before flowering, that is, in early June. For warm regions, this period begins earlier - approximately in the first decade of May. The composition of the solution is as follows: boric acid (5 g) + sodium humate (4 g) + 10 l of water.
- The second foliar top dressing is carried out 2 weeks after flowering. The composition of the solution: boric acid (5 g) + sodium humate (4 g) + kalimagnesia (1 tablespoon) + 10 l of water.
- The third foliar top dressing is carried out at the beginning of berry ripening. The composition of the solution: superphosphate (40 g) + potassium sulfate (20 g) + 10 l of water.
Foliar top dressing is best done on a cloudy day so that the leaves do not dry out longer.
Pruning
There are many options for pruning grapes, but the most universal is fanless, as it is suitable for growing grapes in any region. Pruning is usually done in the spring.
Table: grape pruning algorithm
| Chubuk age | 1st year | 2nd year | 3rd year | 4th year | 5th and subsequent years |
| Ongoing activities | Strong shoots grow 2 m high. Pruning is not carried out. | Select the 2 most viable last year's shoots and cut them into three eyes. As they grow, tie them in different directions symmetrically. | 4 best vines (2 extra remove) use to create sleeves.Cut them 40-60 cm, counting from the ends, and tie to the trellis at an angle of 45about. Remove all shoots except the top ones. | At the end of each sleeve, form fruit links (substitution knot and fruit arrow). To do this, cut the vine located at the bottom into a knot of substitution (an annual vine cut into two buds), and cut the vine at the top for 5-10 buds and tie horizontally. | Form new vines from shoots grown on a knot of substitution. Remove the deflated old arrow. When cutting, leave 2 cm stumps so as not to injure the sleeve. Also sanitize and remove any weak, dried and twisted shoots. Do not allow bush thickening. |

Proper pruning will ensure the grapes develop correctly.
Wintering
In order for the grapes to winter in favorable conditions, it is necessary to properly prepare it. Usually, all events begin in late September - early October, when the temperature will be -5-8aboutFROM.
Training:
- 10-14 days before sheltering the grapes for the winter, spill it abundantly. Water consumption - 20 liters of warm water per bush. Do not neglect watering: in winter, water vapor warms the roots of the plant.
- Cut off all plant debris, unripe vines and dry shoots.
- Remove the vines from the trellis, fold them in a bundle and tie them with twine.
- You can also treat the bush with a solution of copper or iron sulfate (dissolve 100 g of salt in 1 liter of boiling water, and then dilute in 9 liters of water).
There are several ways to shelter grapes for the winter, and you can choose the most convenient for you.
- Trench. This method will reliably hide the roots.
- Dig a trench 20-30 cm deep. If desired, strengthen the walls with boards or pieces of slate.
- Put the grapes harvested in a bunch in it.
- Fill the pit with earth so that the earthen cover is 30-40 cm high, counting from the roots.
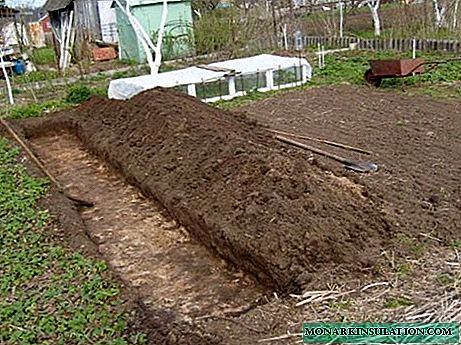
A common way to shelter grapes for the winter is trenches
- Greenhouse. Suitable for a small number of bushes.
- Lay the bunches of grapes on the ground.
- Place greenhouse arcs along the bunches.
- Cover the grapes with spruce branches or sawdust.
- Cover the greenhouse with a film and crush it with bricks. Make sure that there are small slots for ventilation, otherwise the grapes will rot.
The greenhouse is suitable for a small number of vine bushes.
- Hut. For this you need pieces of slate.
- Lay the bunches of grapes on the ground.
- Cover them with burlap, sawdust or straw.
- On top of the workpiece, set the "house" pieces of slate, and also cover them with the ends.
- For greater reliability, strengthen the slate with bricks or earthen embankment.
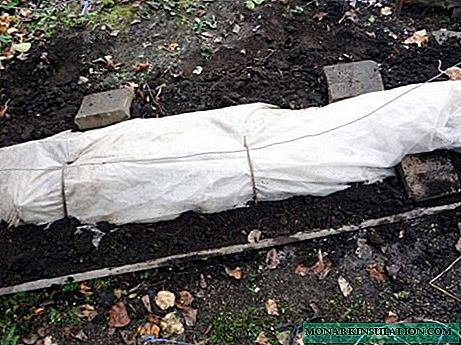
- Earthen mound. When choosing this method, it is necessary to ensure that the roots of the grapes are carefully covered.
- Lay the bunches on the ground.
- Cover them with burlap (leaves, straw, sawdust) and cover them with earth with a layer of 15-30 cm.
Earth shelter does not require the construction of additional structures


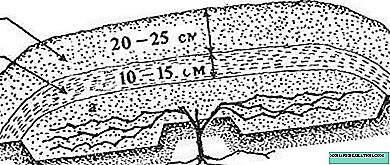
If your grapes are only a year old, then lay the shoots on the ground along a row, sprinkle with wood ash, cover with a film and cover it with a layer of earth 20-25 cm thick. No pruning is necessary, unprocessed bushes better tolerate winter.
Opening grape bushes
Opening times depend on the region: in the southern regions this can be done starting from mid-April, in the colder ones after the first decade of May. 2 weeks before this deadline, open the bush, clean it of earth and debris, dry and cover again. If you use a film, then make sure that the plant does not warp. Cover the bush completely at night, in the daytime it should be open for several hours.
It will be possible to completely remove the shelter and tie up the bush when steady positive temperatures occur at least 7-10 ° C.
Diseases and Pests
In order to ensure the best conditions for the development of grapes, it is necessary to carry out prevention and timely treatment for diseases and pests.
Oidium
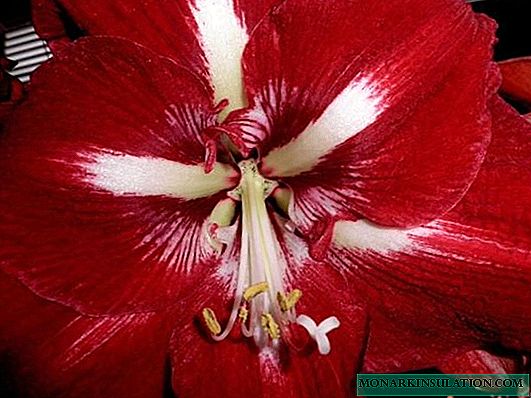
Lera is least resistant to oidium (powdery mildew). This dangerous fungal disease is contagious. The main symptoms: the appearance of grayish-white dust on the leaves and shoots, twisting of leaf plates, the death of parts of the plant, chopping and cracking of berries.

Oidium can destroy the vine bush in a short time
Control measures: sulfur (100 g) + 10 l of water. Prepare a solution and process the bush. Perform the procedure in the evening or in cloudy weather. Repeat the treatment 3-5 times with an interval of 10 days.
For prevention, use the same solution, but take less sulfur - 25-40 g / l. Use sulfur only when the air temperature is above 20aboutC. If you notice signs of oidium at lower temperatures, then use the drugs Cumulus DF, Storbi, Switch or colloidal sulfur.
Pests
Insects are not indifferent to grapes:
- mite. The main symptom is the appearance of bulges and tubercles on the leaves. A cobweb or rusty coating may also appear. The affected bush weakens, loses productivity, leaves fall off. If you notice signs of a tick, then treat the bush with special preparations (Fufanon, Neoron, Actellik), having prepared the solution according to the instructions;
- leaflet. Its caterpillar affects the buds, buds and ovaries, and can also spoil ripening berries. To combat, carry out 3 treatments with special preparations (Fozalon, Sumicidin), having prepared the solution according to the instructions;
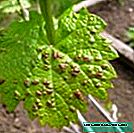
- aphid. When this pest is affected, bulges appear on the leaves on the outside, yellow volumetric rashes on the inside. The bush weakens and loses productivity, the leaves fall. There is a risk not to survive the winter. For the fight, use the preparations Fozalon or Kinmix, after 3-4 treatments.
Photo Gallery: Grape Pests
- Colored bulges on the sheet - a sign of a tick


- Aphids greatly weaken the plant

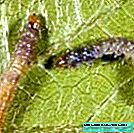
- Leafworm caterpillars can cause significant damage to leaves and ovaries

Reviews
This variety appeared on our vineyard for a long time and still serves faithfully. True, at first he worked on the berry and on planting material, and now as rootstock bushes. The grapes themselves deserve attention: the early ripening date is around August 10, a large marketable berry with hard sweet flesh. But there is one problem: tired of peeling or pollinating clusters. It is very difficult to adapt to her whims and to predict is not entirely possible, that's why she parted with this grape without regret. I don’t know how anyone, but on our site with high humidity, Laura was always the first to catch a mildew.
Fursa Irina Ivanovna//vinforum.ru/index.php?topic=1097.0
Among the many hundreds of varieties we tested, Laura has withstood competition. The variety is the winner. At the market, they first take Laura to me. The berry easily gains weight of 15 g.
MAGOMED//forum.vinograd.info/archive/index.php?t-409-p-6.html
Personally, I like the variety with taste and the market grade is absolutely. But productivity is confusing. I have been growing Laura for 4 years and the crop is quite average - about 5 kg per bush.
Helgi//www.sadiba.com.ua/forum/showthread.php?t=13571
Growing Laura grapes will require some effort from you, but the result will fully justify it. Follow all the care tips, and the vine will delight you with a quality crop.